Having an accurate star mask is essential for astrophotography. I’ve often used the PixInsight Star Mask process to create a good star mask; however, recently I’ve learned how to use the StarNet process to generate star masks.


As you can see, StarNet generated a lot of garbage within the star mask. This will not work as an effective star mask.
I believe the issues with StarNet and my images is because I’m running an imaging rig (12 inch Meade Schmidt–Cassegrain at F/10) with a small field of view. This means my stars are big. They are not pinpoints of light.
But if I use the following workflow, I can get StarNet to work really well on my images, whether they are linear or non-linear.
Stretch
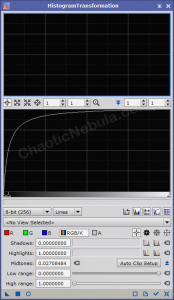
I find that StarNet does a better job with my images if they are stretched. As I’m only using this image as guide, I can do a simple stretch using the Screen Transfer Function and Histogram Transformation
With the image select, hit the radioactive icon in the screen transfer function. This will apply a temporary stretch to the image. To make this stretch permanent, drag the triangle in the lower-left portion of the screen transfer function window into the lower bar area of the Histogram Transformation process window. Apply the Histogram Transformation settings to the image.
Integer Resample
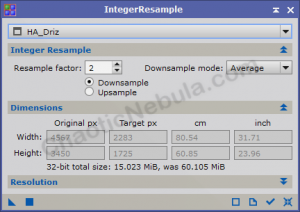
Because of my narrow field of view, and because I drizzle integrate my images, my stars consume a lot of pixels. StarNet seems to have trouble with this setup. But if I shrink my image, StarNet works really well. As an added benefit, by shrinking the images, StarNet runs really fast.
To shrink the image, run the PixInsight Integer Resample process.
With Integer Resample, I downsample my image with a factor of 4 or 6. I use the lowest number that gives me a good result. Plus, with my normal image, StarNet takes around 10 minutes to process. After running integer resample, StarNet take less than 2 minutes.
StarNet
With my image stretched and downsampled, I’m ready to try StarNet. There isn’t much to change with StarNet.
What I’m mostly interested in capturing is the Star Mask.


As you can see, StarNet did a fantastic job removing the stars from my stretched and resampled image. Plus, I now have a excellent star mask. Unfortunately, because I downsampled my image, I lost a lot of detail when zoomed in. So let’s use the star mask on the full-scale image.
Clone Stamp
Before we continue, we need to make a few small corrections to the star mask. StarNet removed the stars, but it also removed some of the brighter details around the nebula. This is seen within the star mask. To correct this, we need to use the Clone Stamp tool to remove those stars from the star mask.
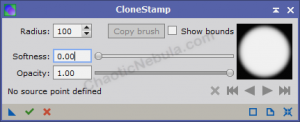
To use this, reset the process, then set the radius size. As we want to completely eliminate the stars, set the softness to 0. This will remove any gradients from the edges.
Find a black area, hit CTRL+LeftMouse. This is the the area you copy from. Left mouse click on the area to paste to.
It’s a good idea to have the original image (with stars) and the star mask sitting on top of each other in the PixInsight window. Zoom into different sections of both images. Blink between the two images with Ctrl+PageDown. This will let you compare the star mask with the original. The mask should only contain stars. Use clone stamp to remove any bright nebula edges.
When down with Clone Stamp, hit the green check mark to apply the modifications.
SAVE the star mask to a file.
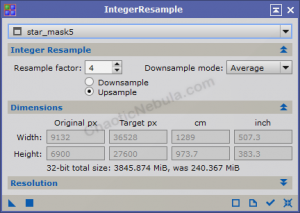
Integer Resample
Crop
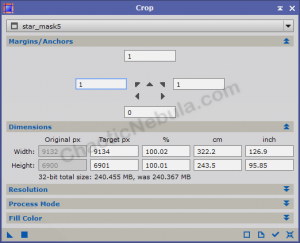
Unfortunately, after upsampling the star mask, the actual dimensions of the file might be slightly different than the original image. In my example, my two images have the following dimensions:
- Original Image: W: 9134, H: 6901
- Star Mask: W: 9132, H: 6900
Because these dimensions don’t match, I won’t be able to use the star mask. However, as I’m only off by 1 or 2 pixels, I will use crop to add them back in. This minor discrepancy will not impact the final image.
With the Crop process, select the star mask. Simply add pixels to appropriate side until the “target px” parameter matches the original image. Because I needed to add 2 pixels for the width, I split them up for right and left.
Range Mask
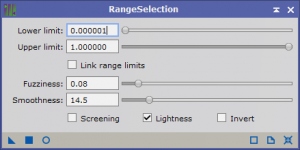
Although we have a great star mask, it still will not completely remove the stars from our image because the stars are too small and too pixelated due to using integer resample to increase the image scale. To correct this, we create a range mask from our star mask image.
Because we are applying this to our star mask, we need to keep the lower limit very low. You will have to type in the value as the slider will create a number that is too large. The star mask should only contain stars and we want to capture everything in the range mask. We increase the fuzziness slightly, which helps remove the pixilation from the integer resample upsample process. If you go too far, you will lose the smallest stars. Finally, we also increase the smoothness, which will increase the size of the stars and create a smooth transition between star and background.


Looking at the before/after, you can see how the stars increased in size slightly.
Final Image
Creating a star mask is essential for astrophotography image processing. There are many ways to do it and the one you will use most will be the one that works the best. This approach is now the best approach for me.

