During the processing of astrophotos, there are times where it is necessary to determine the coordinates, orientation, and field of view. For example, an image must be solved in order to use
- Spectro-photometric Color Calibration: Requires image solving in order to match your image with the Gaia data set in order to apply proper color calibration
- Creating Mosaics: When creating mosaics from multiple image tiles, image solving is critical. It ensures each tile is correctly oriented and positioned relative to the others.
- Annotating Images: With a solved image, PixInsight can accurately annotate the image to highlight the positions of objects and stars
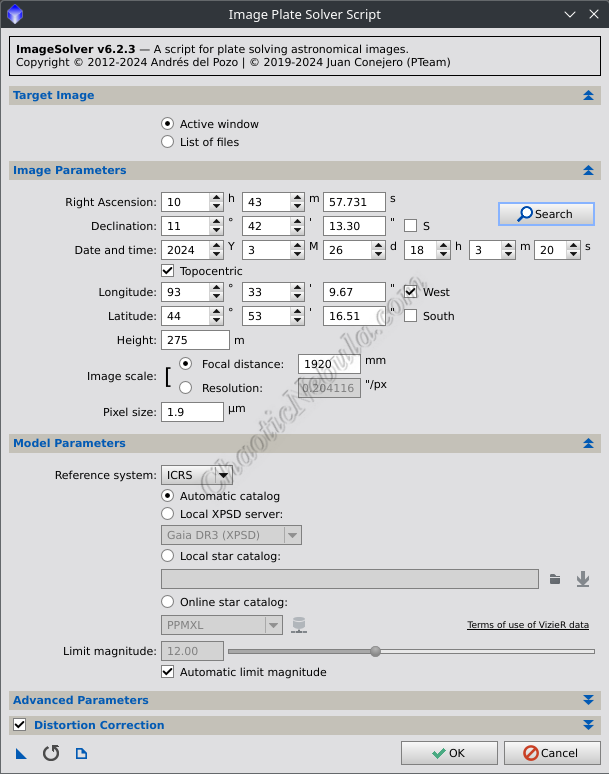
Basic Settings: Image Parameters
For many images, PixInsight Image Solver (Script – Image Analysis – Image Solver) only requires basic information for it to solve the image. These requires items are located in the Image Parameters section.
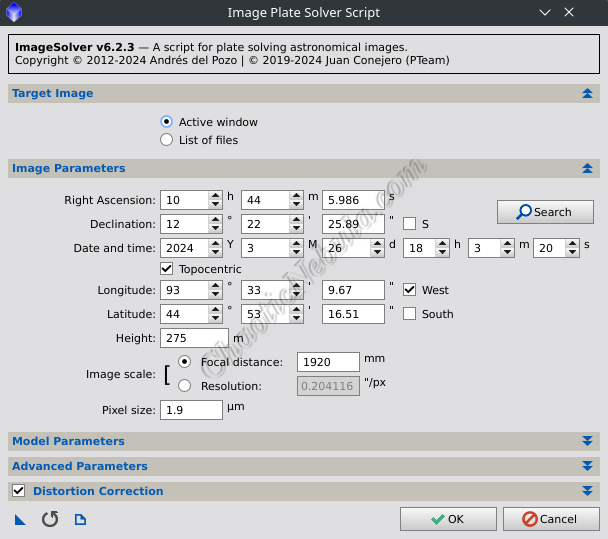
Image Coordinates
In order to solve the image, the Image Plate Solver Script requires right ascension and declination coordinates. These coordinates must be contained within the image.
The easiest way to find the coordinates is to use the search function. This works well when dealing with a single image. However, when creating a multi-panel mosaic, this will not work as the coordinates obtained from search will be the center of the object and will not be contained within the outer frames of the mosaic.
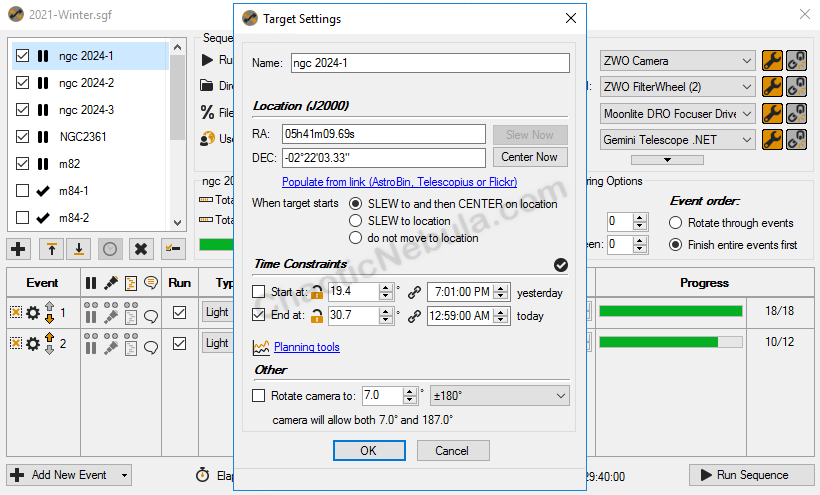
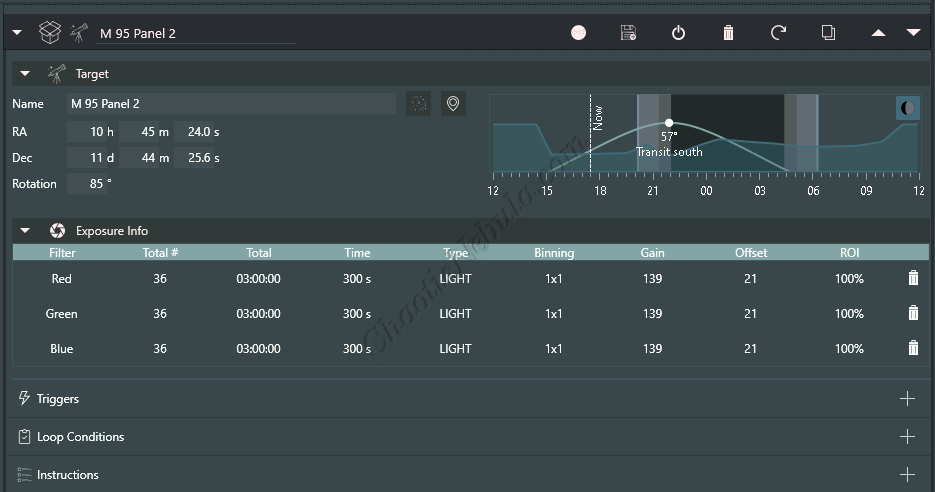
The easiest way to find coordinates for a multi-panel mosaic is to use the coordinates supplied by the astrophotography automation software, like Sequence Generator Pro or N.I.N.A.
Location Coordinates
While not critical for getting the plate solver script to function, providing fairly accurate latitude, longitude, and height does provide greater accuracy in the result.
Image Scale and Pixel Size
Image solving matches star patterns within the image to the known star positions within the reference catalogs. The catalogs list star positions in angular unites like degrees, arcminutes, and arcseconds. To translate these positions into pixel coordinates within your image, PixInsight needs to know the image scale, which is a combination of the focal distance and pixel size. This determines the resolution, defined as arcseconds per pixel.
To calculate arcseconds per pixel, use the following formula;
Arcseconds/Pixel = 206.2648 * ((Camera_Pixel_Size_in_μm) / (Telescope_Focal_Length_in_mm))
- Example 1: 12 inch telescope with a focal ratio of 6.4 using a camera with a pixel size of 3.8 = 40.8 arcseconds per pixel
- Example 2: 12 inch telescope with a focal ratio of 6.4 using a camera with a pixel size of 3.8 with a 2x drizzle integration = 20.4 arcseconds per pixel
Notice that if drizzle integration was applied during the preprocessing phase, the arcseconds per pixel is divided by the drizzle scale.
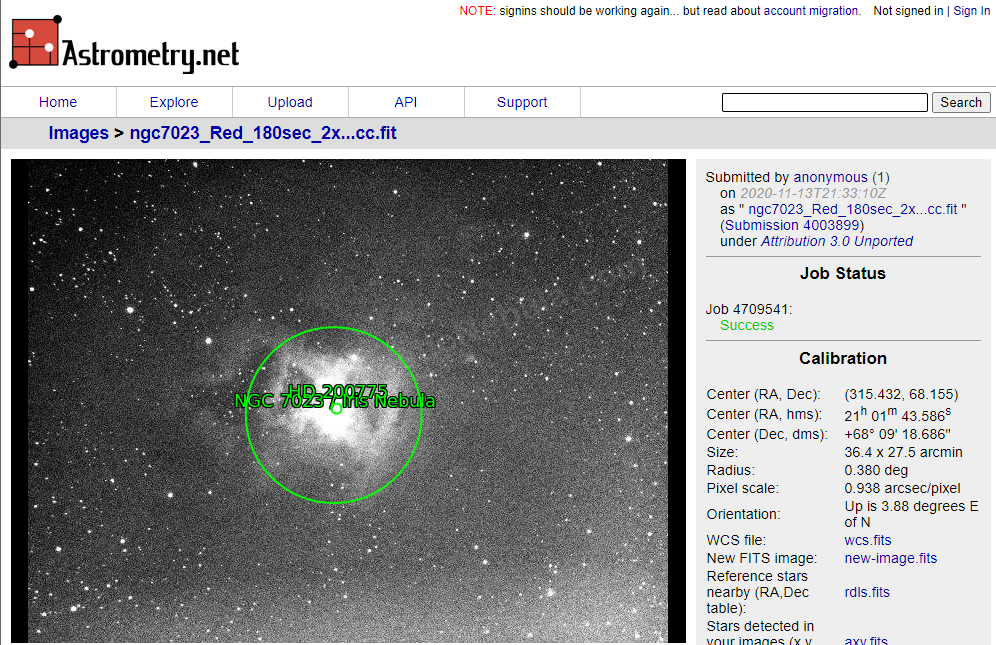
Online tools are also available that can calculate these parameters (as well as provide the image coordinates). If you upload one of the frames to Astrometry.net it provides the subframe scale in arcseconds/pizel.
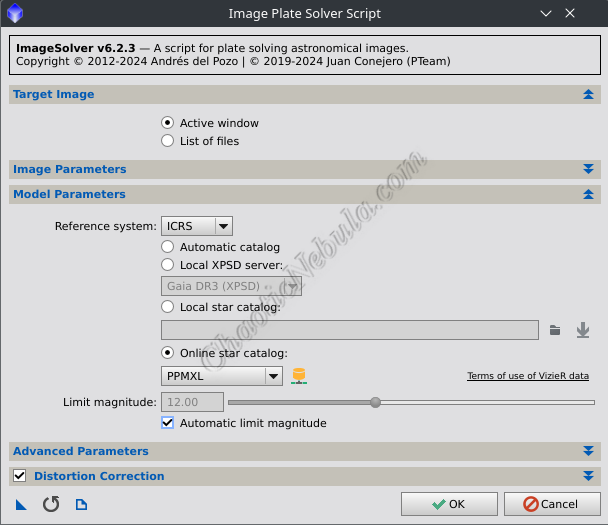
Basic Settings: Model Parameters
You can instruct the image solving script to use specific reference catalogs when solving your image. These options are available in the Model Parameters section of the script.
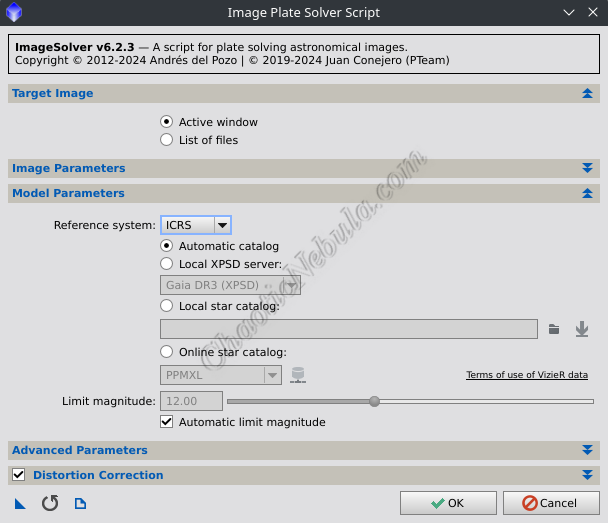
Reference System: The options define the framework for specifying the positions of objects in the sky.
- ICRS (International Celestial Reference System): Positions are measured relative to the solar system’s center of mass (the sun). This is the default option and is appropriate when solving images containing objects outside of the solar system.
- GCRS (Geocentric Celestial Reference System): Positions are measured relative to the Earth’s center of mass. This would rarely be used as it is for solving images near Earth.
Catalogs:
- Automatic Catalog: PixInsight automatically determines if a local catalog (one installed on the same host as PixInsight) is used or if an online catalog is used when solving an image.
- Local XPSD Server: Uses a local reference catalog. This requires you to download and configure the local server with relevant catalogs like Gaia DR2, Gaia DR3, etc. Once you setup the local catalog (instructions contained within this article), this is often a faster method and doesn’t require an internet connection.
- Online Star Catalog: Although slightly slower than the local server, it is the easiest to use and isn’t prone to mis-configurations. However, you have to choose the catalog to use
- PPMXL: Although it covers a large potions of the sky and includes many faint stars, it isn’t as accurate as the Gaia DR2 online catalog. This is the default option and works best for most images.
- Tycho-2: This is the oldest available catalog. Although it is usable, PPMXL and Gaia DR2 are better options.
- Bright Stars: This isn’t a single catalog, but a designation within catalogs that identifies stars brighter than magnitude 13. This is useful for very wide field photography where only the brightest stars are captured, which can speed up the solving process.
- Gaia DR2: This is the newest online catalog available with huge improvements in accuracy and total number of available stars. However, due to the size, it might require more computing time to solve an image.
Magnitude
- Automatic Limit Magnitude: Based on the image provided, the script determines the appropriate magnitude level to safely identify stars within the image while avoiding background noise. This is the default setting.
- Manual Limit Magnitude: The slider allows you to control at what magnitude should stars not be included as part of the model. When working with a small field of view of a very faint object, the automatic option might exclude the faint stars, making it difficult to solve an image.
Image Solver: Results
Once the parameters are set, running PixInsight Image Solver should come up with a solution for the image.
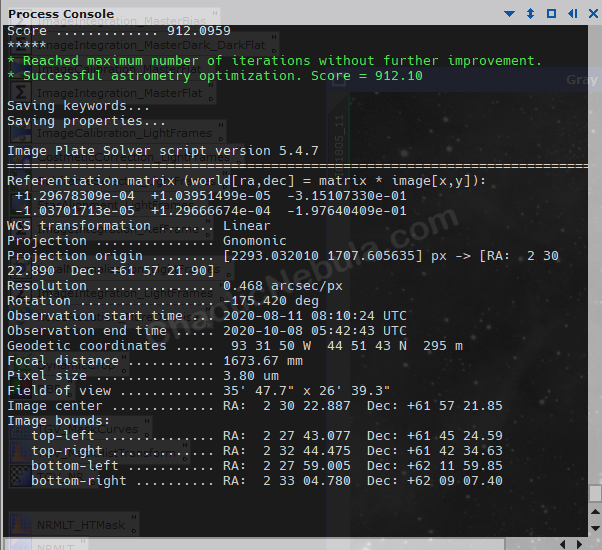
This information is now stored within the FITS header for the image. Remember to save the image.
Troubleshooting
Although the Image Plate Solver does work well, it can be challenging trying to determine why an image solve fails. It usually falls into a few categories
- Issue with Coordinates
- Issue with Reference Catalog
- Issues with Star Detection
Troubleshooting: Issue with Coordinates
Even if you entered in the image’s coordinates correctly into the script’s console, there is the possibility that those coordinates are not being used to solve the image.
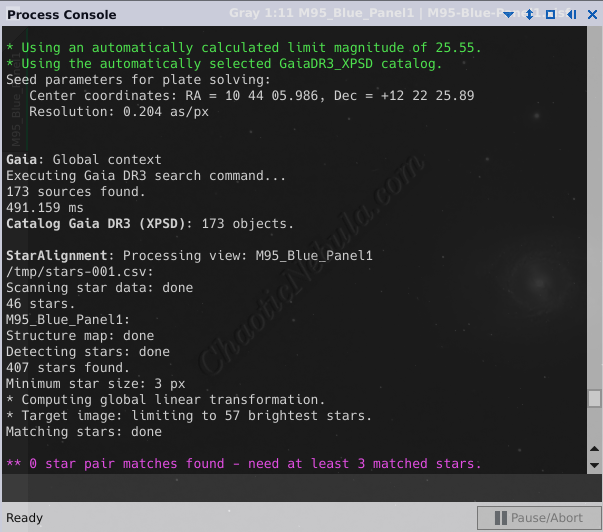
In the following example, the search function was used to supply the coordinates for the image. However, the script failed to solve the image. By looking at the Process Console window within PixInsight, the script shows it is using different coordinates than the ones supplied.
As it turns out, some coordinates were contained within the FITS header of the image. The Image Solver Script was using these coordinates instead of the coordinates provided.
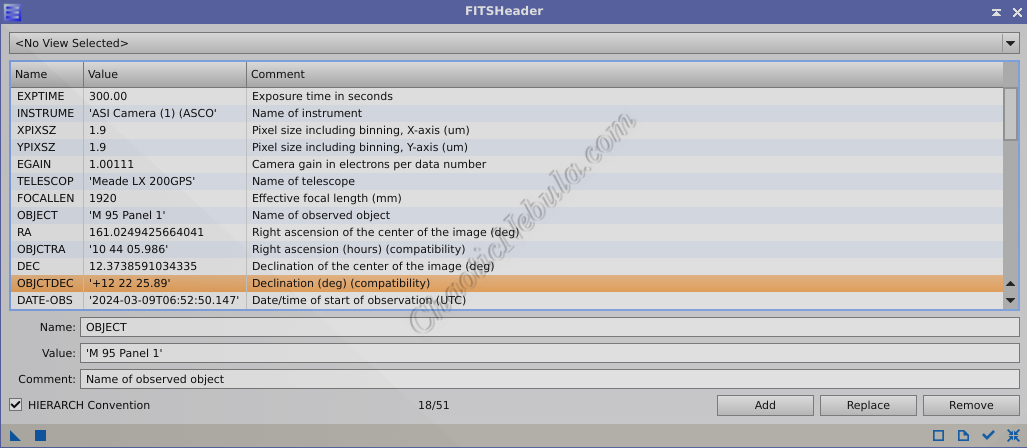
To overcome this issue, the coordinates in the FITS header can either be deleted or updated accordingly so the script works as expected.
Troubleshooting: Issue with Reference Catalog
PixInsight doesn’t verify that a locally deployed reference catalog is functional. If a local catalog is configured, and the model parameters within the image solver script are set to Automatic Catalog or Local XPSD Server, the solve will fail if the catalog wasn’t setup correctly.
The easiest way to verify is to switch the catalog to an online star catalog using PPXML.
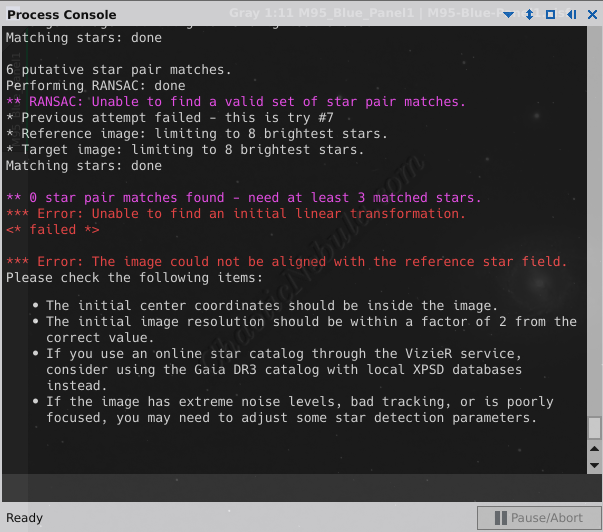
Troubleshooting: Issues with Star Detection
To troubleshoot the reason for the failed solve, you need to look at the output from the process console.
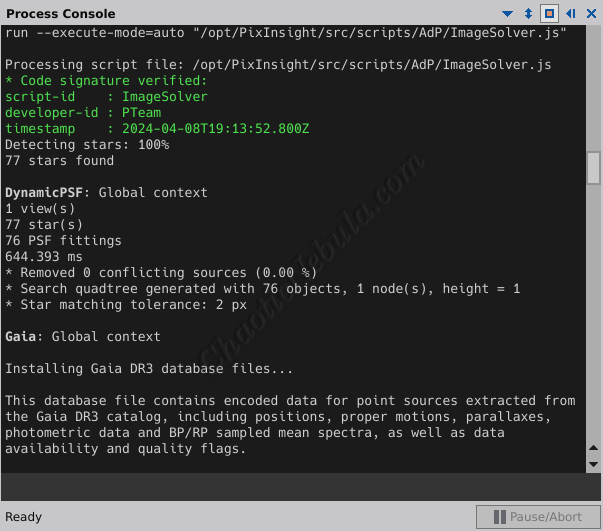
One of the first tasks the script performs is to detect stars in the image. How many stars were detected? Does the number seem right based on the image? Or does the number seem too high or too low? For these difficult images, the Image Solver Advanced Parameters will require adjustments.
There are a lot of settings you can adjust to try and improve the star detection algorithm. However, you need to try and understand the root cause of the issue. Use the following as a guide to for what parameters to focus your attention on:
- Is the image noisy? Focus on the Noise Reduction and Peak Response settings.
- Are most of the stars dim? Focus on the Detection Scales, Sensitivity settings, and Peak Response settings. In the Model Parameters section, disable Automatic Limit Magnitude and significantly increase the value for Limit Magnitude.
- Are most of the stars very large? Focus on the Detection Scales setting
- Are most of the stars small? Focus on the Detection Scales setting
- Are the stars distorted (not circular)? Focus on the Maximum Distortion setting.
- Are too many stars being detected? Focus on the Sensitivity and Hot Pixel Removal settings
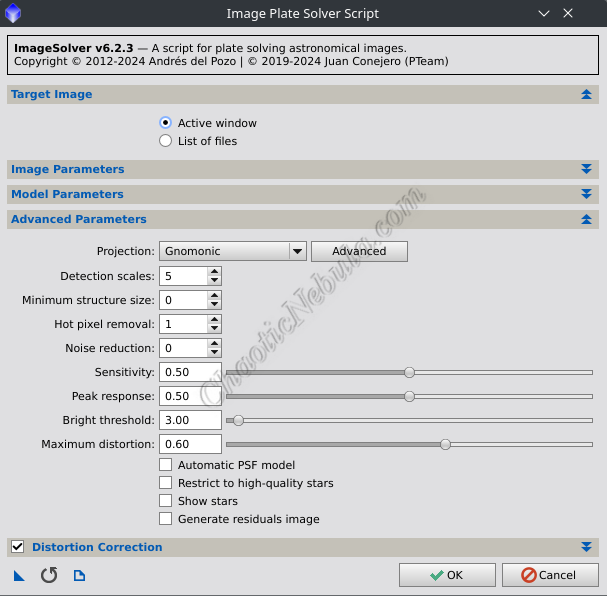
You now need to understand how each of these parameters work, so you can modify them correctly.
- Projection: This is how the celestial sphere is represented in your image. Depending on the field of view, this setting might require changes, but typically, the default value is appropriate. For wide-field astrophotography, gnomonic or stereographic are typical options. For images focused on very small regions, plate carree is a better option.
- Gnomonic: Most common approach for most types of astrophotography. However, it is less accurate when handling distortion near the edges of the image.
- Stereographic: Used for very wide-field astrophotography, especially when the field of view approaches and exceeds 90 degrees. Based on the way it projects the celestial sphere, it provides more accurate distortion handling for very wide field astrophotography. When dealing with mosaic images, this approach is often the best as the field of view can get significantly larger.
- Plate Carree: This is the most appropriate option when dealing with a very narrow field of view. It does show significant distortion for objects far from the center of the image.
- Mercator: Familiar from world maps, this projection, unsuitable for astronomical images, exhibits significant distortions at the poles, making it less favored in this domain.
- Hammer-Aitoff: Emphasizing equal-area representation, this projection minimizes distortions in object sizes but may alter shapes, particularly toward the periphery.
- Zenithal Equal Area: Honoring the relative sizes of celestial objects, this projection may distort shapes while maintaining overall proportional accuracy.
- Detection Scales: Determines the size of the stars that the script should search for. Increase the scale to find larger stars, which might overlook smaller stars. If you decrease the scale, the script will focus on the smaller, dimmer stars. If the image contains mostly big, bright stars (common in open clusters), increase the scale. For images containing many dim stars, lower the threshold.
- Hot Pixel Removal: If the camera is generating a lot of hot pixels, the script could consider these as stars, which will not match with the reference catalog. A hot pixel consistently outputs a higher value, appearing as a bright speck in the image. The Image Solver script can remove ignore detected hot pixels from the star detection process by modifying the Hot Pixel Removal option. Setting this value to “1” looks for hot pixels that are 1 pixel in size, which is typical. A better option is to use Cosmetic Correction to handle hot pixels before solving.
- Noise Reduction: If the image is noisy, false stars could be detected while true stars (faint and small) are missed. The Noise Reduction parameters applies a temporary noise reduction to the image. Increase the value to apply a greater noise reduction filter on the image. However, this will reduce the star position accuracy. Unless the image is extremely noisy, this parameter can often be left at 0 (disabled).
- Sensitivity: Adjustments to the sensitivity slider below .50 will limit the script to focus on brighter stars, helping to reduce the number of detected stars. Adjusting above .50 will allow the script to focus on fainter stars, helping to increase the number of detected stars. This is useful when the image only has a few bright stars and many faint stars.
- Peak Response: Determines how bright a pixel needs to be for it to be considered part of a star. A higher value is more selective, only focusing on brighter pixels as potential stars. This is useful for noisy images. However, increasing this parameter will often miss fainter stars within the image. If the image is dim or contains many faint stars with low noise, lower the value.
- Bright Threshold: This parameter is a rejection threshold. It excludes pixels that are completely saturated in the image. This is useful if there is a bright foreground object (like an airplane or satellite). Unless the image is overexposed or contains bright foreground objects, this parameter can often be left at the default value.
- Maximum Distortion: Most stars will not be perfectly round. The maximum distortion parameter allows you to set how far from a circle a star can be for it to be considered a star. A perfect circle has a value of 0.8 and the default value is 0.6, which shouldn’t require modifications.
- Automatic PSF Model: Uses different PSF models for the star identifications. This only provides minimal accuracy improvements and can often be ignored.
- Restrict to High Quality Stars: Only applicable when using local XPSD reference catalogs that leverage Gaia DR2 or DR3. It restricts the selection of stars for matching based on the quality of information contained in the reference catalog. This setting can typically remain disabled.
- Show Stars: When the image is analyzed, a new blank image is created with marks for where the detected stars are located. This helps you see how the changes to the parameters image the results. It is often easier to see the detected stars by inverting the generated image (black background with white pixels for stars)
- Generate Residuals: When the solve is successful, lets you see what stars are detected (green mark) vs incorrect stars (red mark).